This tutorial will show you how to do MLA Format using Pages on your Mac. This tutorial makes use of Pages version 5.1. It is very easy and we are going to accomplish the following settings:
- All text is font “Times New Roman” & Size 12.
- One-inch page margin for all sides (top, bottom, right and left).
- A header with your last name and page number 1/2 inch from the top-right of each page.
- The entire research paper is double-spaced.
- Your name, name of professor, course title, and due date of paper on the first page.
- Your research paper title is centered.
- Body paragraphs have a 1/2 inch first line indent.
- A Works Cited page beginning on a separate page at the end of the paper.
I. How to Set the Font and Size:
- Start your Pages App => Click on New Document to create a new document => Choose the Blank Template.
- By default, Pages uses font Helvetica and font size 11. These are not right and we need to change them.
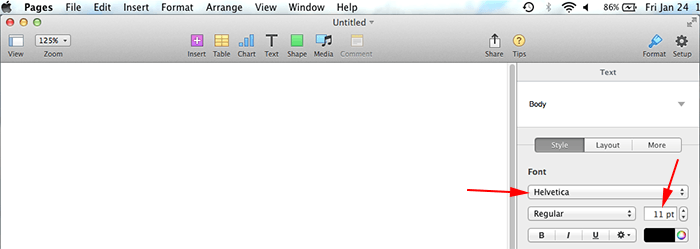
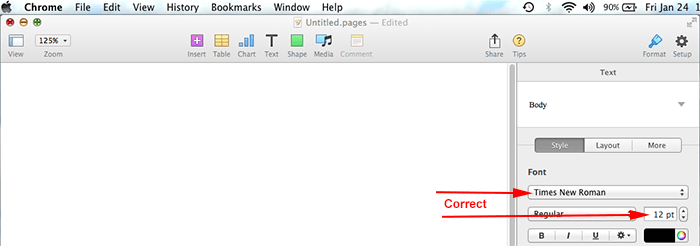
- Click on the font name and change it to Times New Roman.
- Click on font size 11 and change it to font size 12.

II. How to Set the Margins in Pages on Mac:
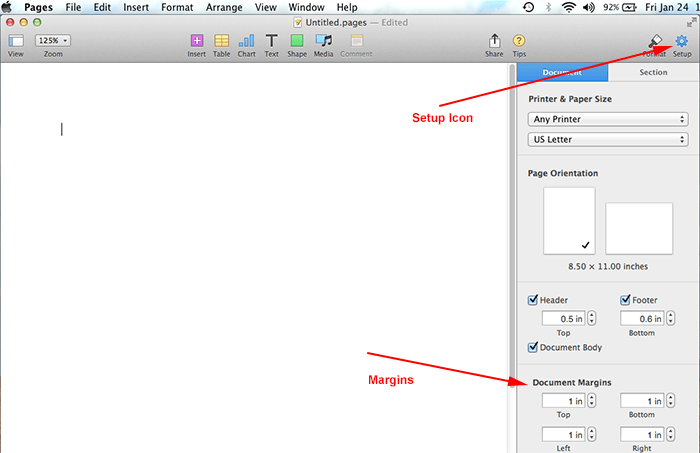
By default, Pages uses the default margin of 1″ inch for all top, right, bottom & left and that is correct so there is no need to change.
If you would like to verify the margins, here are the steps: Click on the Setup icon located on the very top right corner => then set the margins under Document Margins.
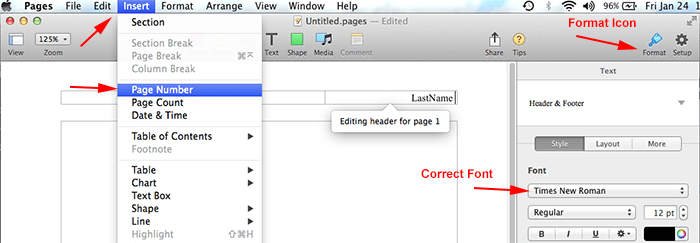
III. How To Create a Header in Pages on Mac:
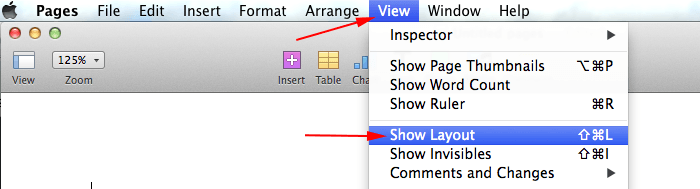
- Click on View => click on Show Layout => a layout of your document and header should now appear.

- Click on the Format Icon to display the font properties (see in the image below for the Format Icon location).
- Click on the 3rd box on the Header.
- Notice the font on the Header is NOT Times New Roman => change the font to Times New Roman.
- Type your LastName => hit the Spacebar key on your keyboard once => click on the Insert => click on Page Number (to insert automatic page number).

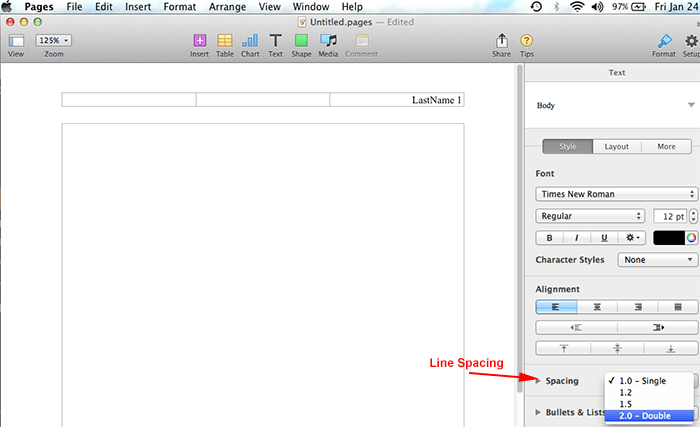
IV. How to Setup Line Spacing to Double Spaced:
- Under Spacing => click on “1.0 – Single” and choose “2.0 – Double“.

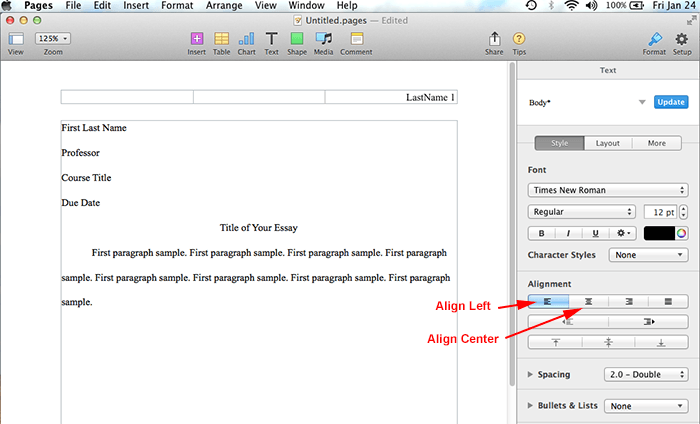
V. How to Enter the First Page Information:
- Type your full name => press Enter.
- Type your professor’s name => press Enter.
- Type course title => press Enter.
- Type your paper’s due date => press Enter.
- Click on the Align Center icon on the formatting toolbar (to center your blinking cursor) => Type the title of your paper, capitalizing the first letter and all major words and proper nouns. Do not use italics, boldfaced type, underlining, or all caps to format your title. Do not type a period at the end of the title => press Enter.
- Click on the Align Left icon (to bring your blinking cursor to the left).
- Click on the Tab key to indent 1/2 inch to begin your first paragraph. Use the Tab key on every next new paragraphs. Your completed setting should look like this:

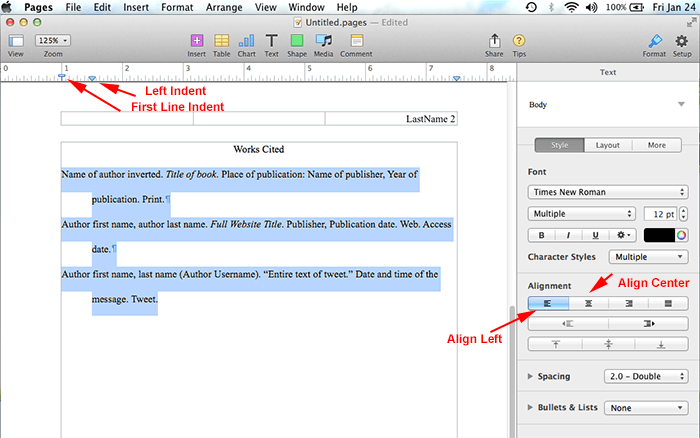
VI. How to Setup the Works Cited Page:
Follow this how-to when you are ready to work on your Works Cited page. The Works Cited page has the following characteristics:
- A heading “Works Cited” centered one inch below the top edge of a new page. Do not bold or underline this heading.
- No indent on the first line of each entry. If an entry runs more than one line, indent the subsequent line or lines 1/2 inch from the left margin.
- Alphabetize entries in your list of works cited by the author’s last name, using the letter-by-letter system.
- Immediately after typing the final line of your paper, click on Insert => Page Break (to begin a new page). Your header with your last name and automatic page numbering should appear at the top right of your paper.
- Click on the Align Center icon so that the text is centered.
- Type Works Cited (do not underline, boldface, italicize, or enclose the title in quotation marks).
- Press the Enter key once to begin a new line.
- Click on the Align Left icon so that the text is aligned left.
- Now type your sources. Don’t worry about indentation on the subsequent line/lines yet.
- Once you are done typing your sources => highlight all your sources => click on View => click on Show Ruler => now click on the Left Indent icon and drag it to the 1/2 inch mark.
- Now click on the First Line Indent icon and drag it to 0 inch mark. You are done setting the Hanging Indent for your Works Cited page.

I hope you found this tutorial helpful. Take care!
very helpful.
This was exactly what I needed, thanks!!!
it’s very helpful
helpful, thank you
Extremely helpful and straight to the point. Thank you!!!
GOD BLESS YOU WITH YOUR ANSWER ABOUT PAGE NUMBERS!!!
honestly the easiest and quickest instruction to read 🙂
Bless you
This tutorial helps me a lot. Thank you so much!
Very helpful!