This tutorial will show you how to do MLA Format using Google Docs on Google Drive. It is very easy and we are going to accomplish the following settings:
- All text is font “Times New Roman” & Size 12
- One-inch page margin for all sides (top, bottom, right and left)
- A header with your last name and page number 1/2 inch from the top-right of each page
- The entire research paper is double-spaced.
- Your name, name of professor, course title, and due date of paper on the first page
- Your research paper title is centered
- Body paragraphs have a 1/2 inch first line indent
- A Works Cited page beginning on a separate page at the end of the paper
There are two methods:
– Method 1, to use a Google Template with settings pre-configured
– Method 2, to perform the settings yourself (recommended)
Method 1: Using a Google Template:
- On the Google Docs menu, click on File => New => From Template.
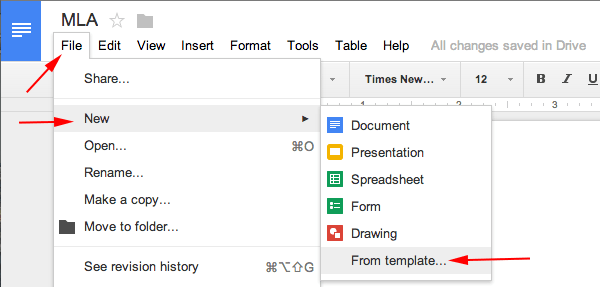
- In the newly opened window, you will see many professional templates.
- Scroll all the way down
- Under the Education category, click on the template that says “Report MLA“
- The template will be copied to your Google Drive and you are ready to type your essay.
Method 2: How to Perform all of the Settings Yourself:
I. How to Set the Font and Size:
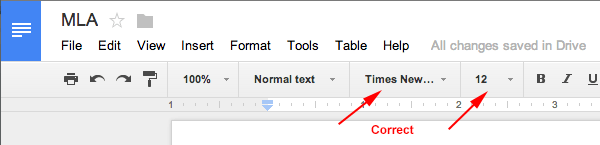
- When you create a new document, the default font is Arial and size 11.
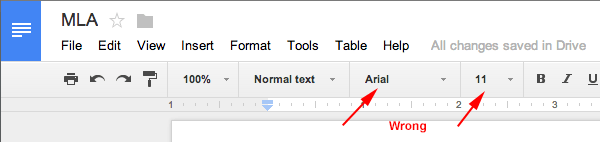

- Click on the font and change it to Times New Roman.
- Click on font size 11 and change it to font size 12.

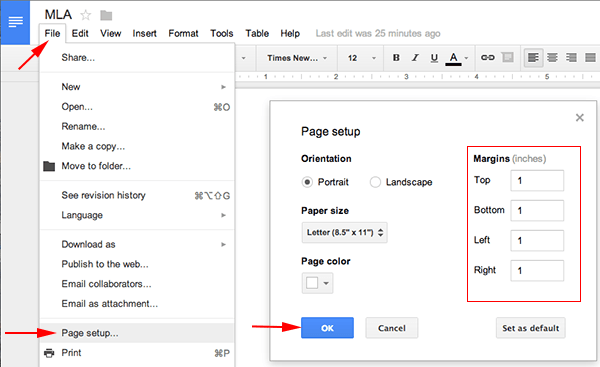
II. How to Set the Margins in Google Docs:
Google uses the default margin of 1 inch for all top, right, bottom & left so there is no need to change.
If you would like to verify the margins, here are the steps: click on File => Page Setup
III. How To Create a Header in Google Docs:
- Click on Insert => click on Header & page number => click on Header.


- Notice the font on the Header is NOT Times New Roman => change the font to Times New Roman and font size 12.
- Notice the cursor is blinking on the left, click on the Right Align icon to align the cursor to the right.


- Press the Enter key on your keyboard twice.
- Type your Last Name => press the Spacebar key on the keyboard once.
- Click on Insert => Header & page number => Page number => then click on the first box.
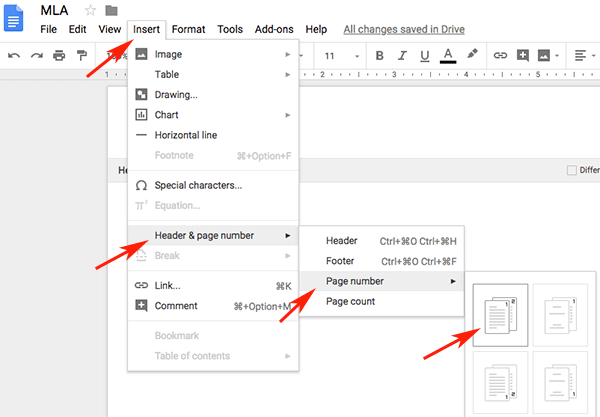

- Now click on anywhere below the Header line to close the Header.
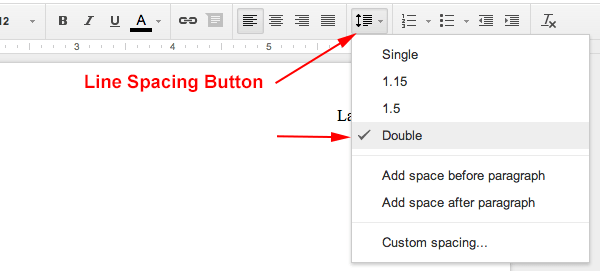
IV. How to Setup Line Spacing to Double Spaced:
- Click on the Line Spacing button => Choose Double.

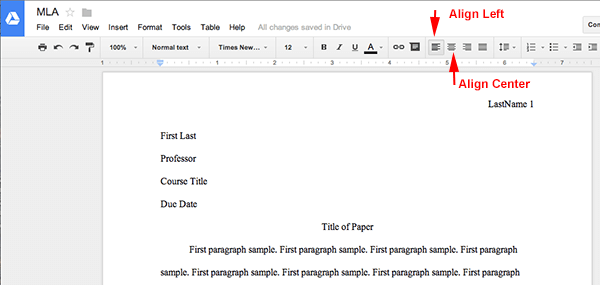
V. How to Enter the First Page Information:
- Type your full name => press Enter.
- Type your professor’s name => press Enter.
- Type course title => press Enter.
- Type your paper’s due date => press Enter.
- Click on the Align Center icon on the formatting toolbar (to center your blinking cursor) => Type the title of your paper, capitalizing the first letter and all major words and proper nouns. Do not use italics, boldfaced type, underlining, or all caps to format your title. Do not type a period at the end of the title => press Enter.
- Click on the Align Left icon (to bring your blinking cursor to the left).
- Click on the Tab key to indent 1/2 inch to begin your first paragraph. Use the Tab key on every next new paragraphs. Your completed setting should look like this:

VI. How to Setup the Works Cited Page:
Follow this how-to when you are ready to work on your Works Cited page. The Works Cited page has the following characteristics:
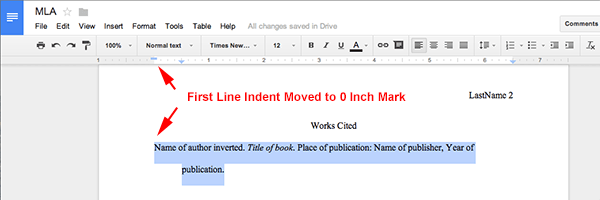
- A heading “Works Cited” centered one inch below the top edge of a new page. Do not bold or underline this heading.
- No indent on the first line of each entry. If an entry runs more than one line, indent the subsequent line or lines 1/2 inch from the left margin.
- Alphabetize entries in your list of works cited by the author’s last name, using the letter-by-letter system.
- Immediately after typing the final line of your paper, click on Insert => Page Break (to begin a new page).
- Click on the align center icon so that the text is centered.
- Type Works Cited (do not underline, boldface, italicize, or enclose the title in quotation marks).
- Press the Enter key once to begin a new line.
- Click on the align left icon so that the text is aligned left.
- Now type your sources. Don’t worry about indentation on the subsequent line/lines yet.
- Once you are done typing your sources => highlight all your sources => click on the Left Indent icon and drag it to the 1/2 inch mark.


- Now click on the First Line Indent icon and drag it to 0 inch mark. You are done setting the Hanging Indent for Google Docs.

You are done with the settings. I hope you found this tutorial helpful. Take care!
this is soo helpful
THANK YOU!! I’ve been out of school 20 years, this just saved me so much time!!!
THANK YOU!!!!!!!!!!
Thank you for the help!
Thank you It has helped me a lot!
Thanks a bunch
THANK YOU
This really helped me. It was really easy to understand and it saved my grade. Thanks!
thank you for this. It helped me get a good grade 🙂
super helpful with the header!
THANKS so much
This was really helpful thx
bless ur soul,, i hope you live a long, happy life surrounded by the people you love and care about
Amazing thanks.
It’s really helpful
Helped 🙂
Bless your heart
This is awesome for people using the desktop version. However, when using the app on iPad, none of this works and the iPad won’t let you use the desktop version without constantly trying to move you into the app. The app formatting options are much more limited and much harder to find. If anyone knows of a similar tutorial for the iPad app version, that would be GREATLY appreciated.
Thank you so much this helped me out so much
OMG you saved my life I stayed up all night doing my English project and yo guys saved MY STICKEN LIFE THANKS
I’ve been doing this my whole life and couldn’t figure it out so thank you. SIncerely, a 15 yr old.
Thank you, sir for making my life so convenient and smooth!
This site is my saving grace! I am 34 years old and it has been 10 years since I last attended school. I am now taking online classes for my associates degree and have used this website to guide me through my English course. It’s awesome!!
Extemly well put together! wow!!! Thank you, as I am new to this and have a google chromebook.
That was so helpful! Thank you so much, your tutorials are awesome!
Thanks
Thank you so much for this tutorial. It was smooth and to the point. It helped reduce a lot of stress for my freshman year in college. Thank you again! I will definitely be using this in the future.
Best regards!
This is an awesome resource! I’m going to use this for my students.
So helpful
Thanks